--more--

- Length: 10 inches
- Width: 7 inches
- Depth: not specified, to be determined
Since we have now determined that the insert has a length of 10 inches and a width of 7 inches, we have thus established that the inside dimension of the presentation box is 7-by-10 inches. The outside dimension of the finished box cannot be determined until we add all four sides to the box. After we add the sides and cover them in blue covering-paper, we must measure the total outer side-to-side length and width. These final measurements will then determine the inner dimension of the box cover.
The second step in designing the insert was to determine how big the three recesses will be. We began this determination by planning the recess for the mug. In order to establish the size and shape of the recess for the mug, we drafted a pattern, known as a cross-sectional template, which is the guide for planning and constructing the mug's recess.
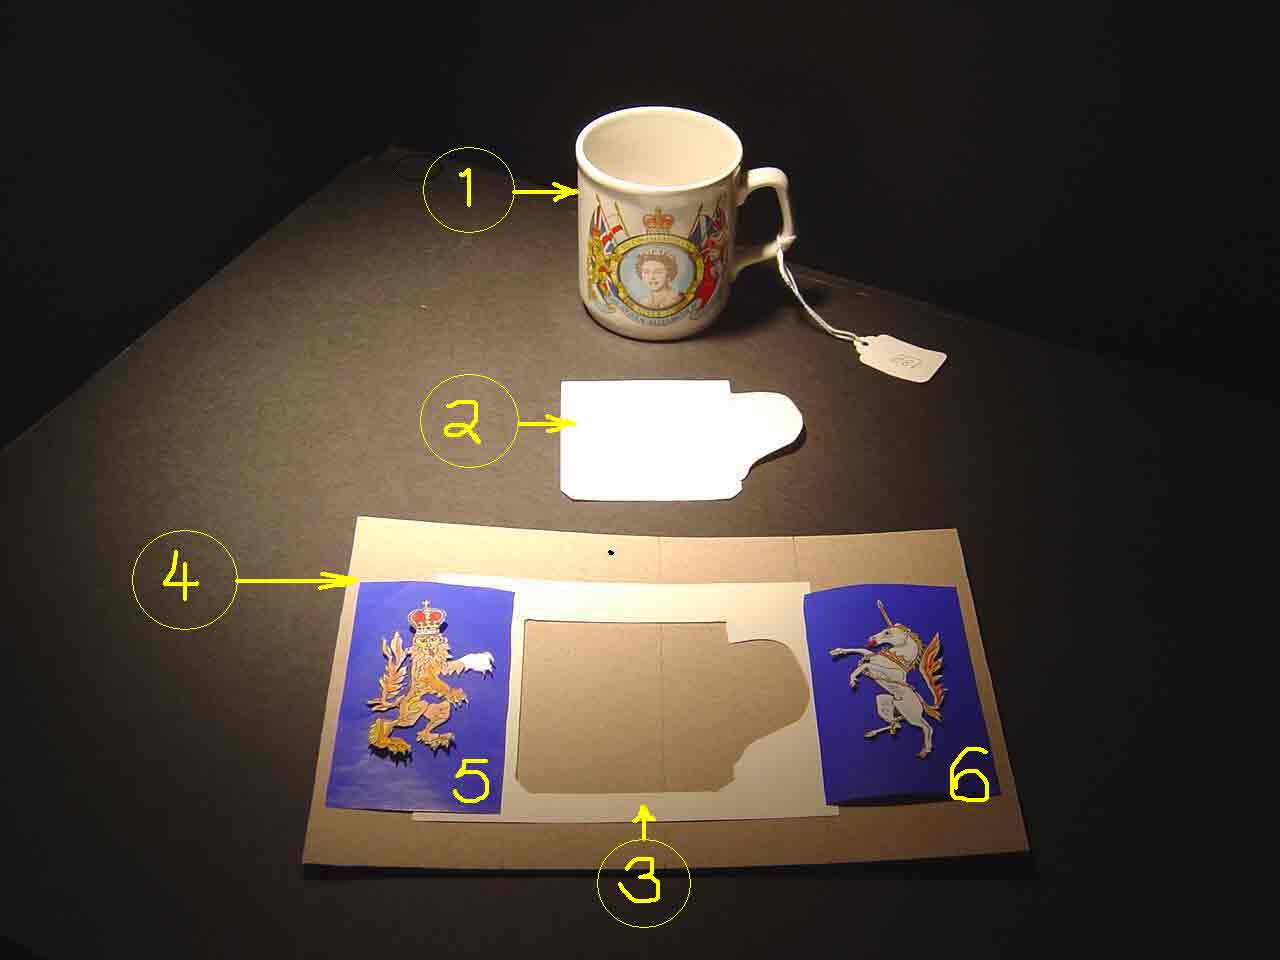
A cross-sectional template is similar to a silhouette. A silhouette is a solid-colored outline picture of a subject (for example, a profile of a person's head) with no details shown within the outline. To create our cross-sectional template, we first created a paper silhouette of the mug. The silhouette represents the mug seen from the front, with the handle on the right (exhibit 2).
The main part of the mug's silhouette needed to be carefully drafted, using exact measurements taken on the actual mug. The handle part of the silhouette was made separately from the main part by tracing the outline of the handle on an index card. The main silhouette and the handle silhouette were then taped together.
The outline of the completed silhouette was then traced upon a sheet of thin boxboard, then a copy of the silhouette was cut out along the traced outline and discarded (exhibit 3). Why make a copy of the silhouette only to discard it?
The reason is that we didn't want another silhouette - we wanted a template, which is a flat hollow space that possesses the exact outline of the silhouette. Why do we need a template? A template is needed because we must pass the mug through the template to see if the outline of the actual mug fits correctly into the template.
The reason for this is that the template will dictate the shape of the deep recess in the center of the presentation box. The deep recess, for appearance's sake, must accept the mug in the same manner that a molded egg-box accepts the shapes of the eggs. The fit must not be too snug, or removing the mug would be difficult. The fit must not be too loose, because then the mug might not maintain the correct position inside the recess, ruining the overall appearance of the display.
The third step in designing the insert was to make sure there was enough room on each side of the mug's recess to accept the decorative plaques, which will be embellished with heraldic supporters. To accomplish this step, we cut out two pieces of blue paper to the approximate size of the proposed plaques. Then we carefully cut out a lion rampant guardant and a unicorn rampant from the reduced-size photocopy shown in Plate 127, exhibit 6.
The cut-outs of the supporters were placed upon the blue paper rectangles representing the plaques, then the rectangles were positioned on either side of the template (exhibit 5 and exhibit 6).
As the above photo reveals, the 7-by-10 inch boxboard is sufficiently wide to accept the recess for the mug and the recesses for the two plaques. Observe also that the two plaques are neither too wide nor too narrow for the heraldic supporters with which they will be embellished.
Go to top of page