--more--
A perfect solder joint is something like a "bronzed" baby shoe: the shape and details of the joined wires can be seen through the bright, thin coating of solder.
Go to top of page
| For reference books and articles relating to these pages, see our bibliography | ||
| Are you getting tired of looking at trains? Try the Mad Toy Collector's exhibition, or visit The Heraldry Guy! | ||
| Searching for a particular topic in these pages? Try our subject index (updated continually) | ||
| It's all being made into a serialized movie! Click here to watch the movie episodes! | ||
| Go to the Next Plate | Go to the Previous Plate | Go to the Numerical Plate Directory |
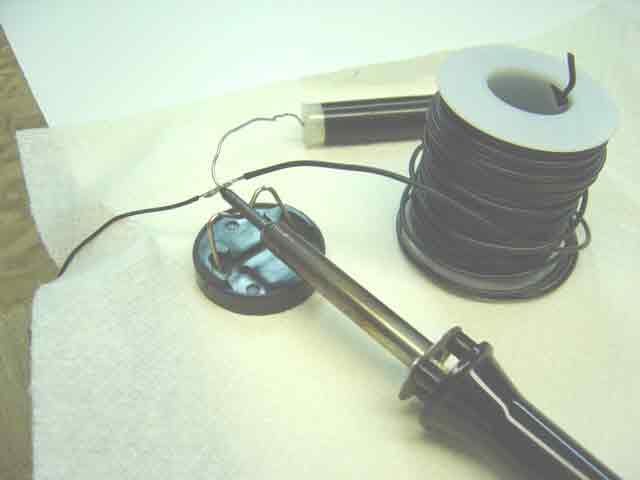
Plate 244: Wiring the point motors through the distribution center, Part 22: applying solder to a mechanical joint
(This plate added NOV 2003)
|
The accompanying picture illustrates the best method of creating a perfect solder joint between two stripped wires. The most important thing to know is that we heat the joint, we do not heat the solder. Observe that the hot soldering iron is touching the joint from below, and the spool of solder is touching the joint from above. When the joint is heated to the temperature of the soldering iron, the solder melts and runs down into the joint. The melting solder flows into a bright, shiny silver coating all over the joined wires. When we are satisfied that the solder has penetrated all around and through the joint, we first remove the spool of solder from the top of the joint, and then we remove the iron from beneath the joint.
--more-- |
|
|
Always remove the spool of solder before removing the soldering iron. If the iron is removed while the spool of solder is still touching the joint, the solder from the spool will stick to the joint.
A perfect solder joint is something like a "bronzed" baby shoe: the shape and details of the joined wires can be seen through the bright, thin coating of solder. Go to top of page |
|